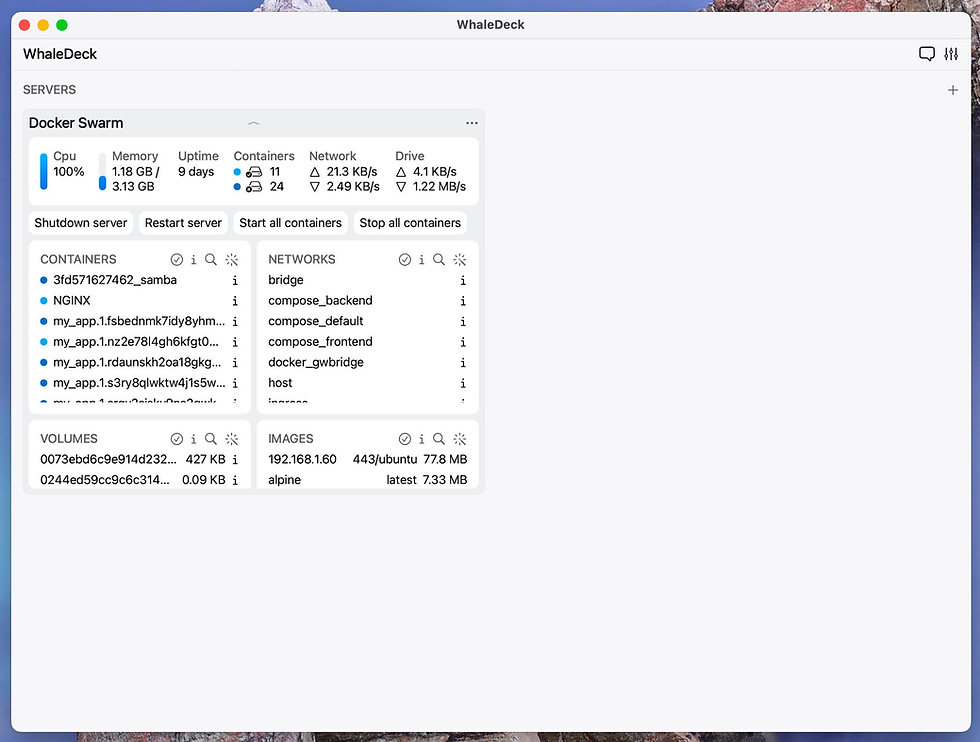
Monitor, Control and Debug Docker Containers with WhaleDeck
- GeekGuy
- Aug 21, 2023
- 4 min read
Only available for MacOS, WhaleDeck connects to your Linux servers hosting Docker containers and simplifies a number of tasks associated with container management.

When you want to work with your Docker containers, do you opt to use the command line or do you prefer to go the GUI route?
If the latter, you’ve probably found a mixture of tools that range from the overly complex to the vastly simplified. More than likely, you’d prefer something that exists somewhere in the middle, where form and function meet to create an app with just the right amount of features that make it easier for you to monitor, control, and debug those containers.
I’ve tried a wide variety of GUIs for Docker Containers and although I’m partial to Portainer, I understand that particular tool can be a bit much for some.
Fortunately, I’ve found a tool that makes working with Docker containers about as simple as possible. The app in question is called WhaleDeck and it’s only available for MacOS, iOS, and iPadOS devices. WhaleDeck easily connects to your Linux servers hosting Docker containers and simplifies a number of tasks associated with container management.
Before I continue, know this app does have its limitations. For example, you can’t build and deploy a container from WhaleDeck. But what you can do is:
Shutdown/restart the server
Start all containers
Stop all containers
Start, stop, and pause individual containers
Manage networks and volumes (Pro version only)
View resources (CPU, Memory, Uptime, Containers, Network, Drive), mounts, ports, and logs.
What I find most impressive about WhaleDeck is it gives you more information than you might need for a container. When viewing an individual container, you’ll see create, start, and finish dates, state restart policy, PID, platform, image, mounts, networks (IP gateway and IP), ports, and exposed ports. Besides building and launching containers, the only other feature missing from WhaleDeck is the ability to manage images.
As far as security is concerned, the passwords configured in WhaleDeck are safely stored in Apple’s iCloud Keychain, so only you can access them. On top of that, WhaleDeck does not track user statistics, so you don’t have to worry that the developers are keeping tabs on you.
Think of WhaleDeck as your Docker management console, where you can observe and manage your containers from your MacBook, iMac, iPhone, or iPad.
The basic WhaleDeck feature set can be used for free with two connected servers. If you need to connect WhaleDeck to more than two servers, you’ll have to pony up for the Pro version, which is only a one-time $19.99 cost. The Pro version not only gives you unlimited servers but also adds MacOS Server support, iCloud sync, and Custom settings.
Let’s get WhaleDeck installed and see how easy it is to connect it to your Docker server.
Installing WhaleDeck
I’m going to demonstrate the installation of WhaleDeck on MacOS (as I don’t have either an iOS or iPadOS device). If you’ve ever installed an application on MacOS, you know how simple it is and the installation of WhaleDeck is no different.
All you have to do is open the MacOS App Store and search for WhaleDeck. Once you see the entry (Figure 1 – by Florian Seida), click the Get button to install the app.

Once WhaleDeck is installed, you’ll find it in the MacOS Launchpad. Click the launcher to open the app. When WhaleDeck first opens, you’ll be greeted by an onboarding wizard that walks you through how the app is used (Figure 2).

At the end of the onboarding wizard, you can also opt to test the Pro features (for 14 days).
Adding your First Server
After clicking through the onboarding wizard, you’ll land on the main page, which is fairly empty (Figure 3).

To add your first server, click the + button in the upper right corner. In the resulting popup (Figure 4), fill out the required information.

You’ll need:
Alias – a nickname for your server
Host – IP address or domain for your Docker server
Port – This is the SSH port used on your hosting server
Username – a username that belongs to the docker group on your server
Password – the password for the user
Operating system – if you’re using the free version, you can only select Linux
Key – if you use SSH key authentication, you’ll need to add the key here
After filling out the necessary information, click Save server and WhaleDeck will go through the process of connecting to the server. If you wind up with an error, it could be that you’ve not accepted the SSH fingerprint from the server. Should that be the case, open the MacOS terminal app and SSH into your server. Accept the fingerprint and complete the login process. Once you’ve done that, you should be able to successfully save the server.
With the server added you can double-click the entry to expand it, where you can start managing your containers (Figure 5).

At this point, you can double-click on a container listing to open a window (Figure 6) that allows you to view various aspects of the container as well as stop/start/pause it.

And that’s all there is to installing, connecting, and using the WhaleDeck Docker management app. Give the free version of this tool a try and see if it doesn’t make managing your containers a bit easier.

Comments